Signal Chain
Overview
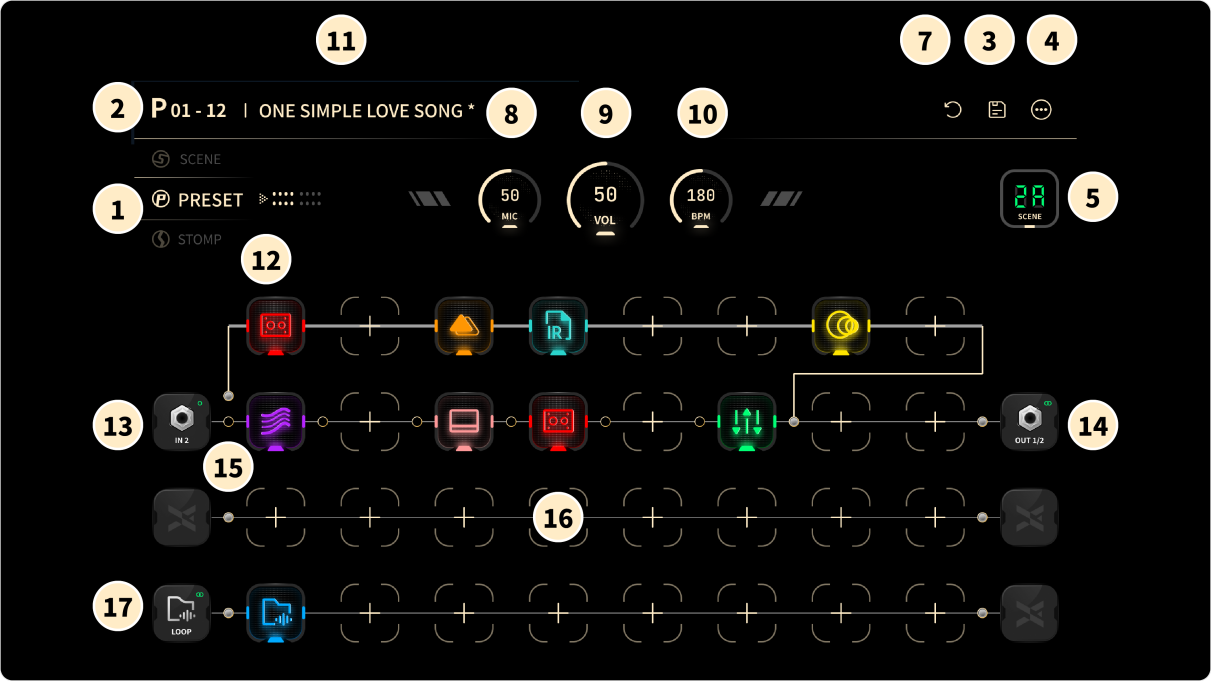
The numbers below match the callouts in the figure above.

-
Scene / Preset / Stomp / Combo modes
- These modes let you switch tones quickly while you play.
- Four modes are available: Scene, Preset, Stomp, and Combo.
- Tap and hold to open Mode Editor and set up Combo mode.
- See Live View for details.

-
Preset number
- A Preset number such as P01-12 has two parts.
- P01 is the Patch number. Each Patch contains 16 Presets.
- 12 is the Preset number inside the current Patch.
- Tap to browse all Presets.
- An asterisk (*) means the current changes have not been saved.
-
Save Preset button
- Save: tap to save all changes to the current Preset.
- Save As: tap to create and save a new Preset.
-
More button
- Copy Preset/Scene: tap to copy all settings from the current Preset or Scene.
- Paste Preset/Scene: tap to paste the copied settings into the current Preset or Scene.
- Performance Mode: opens the same mode selection as item 1.
- MIDI Out: tap to edit the MIDI messages sent by the footswitches and expression pedals, so XR1 can control other devices. See MIDI Out.
-
Scene button
- A Scene stores a set of parameter values for the current Signal Chain. Each Preset holds up to 16 Scenes: 1A–8A on page 1 and 1B–8B on page 2.
- In Scene mode, tap this button to switch Scenes.
-
Undo / Redo buttons

-
Mic Out volume
- Sets the level of the microphone output (MIC OUT).
-
Master Volume
- Sets the level of OUT 1/2, OUT 3/4, SEND 1/2, PHONES, CapX Output, and USB Out.
-
BPM
- Shows the tempo in beats per minute (BPM). The tempo can be stored globally, with the Preset, or with the Scene.
-
Preset name


-
Effect block
- XR1 includes a wide range of effects that closely reproduce their analog counterparts. Select an effect and adjust its parameters to build your own tone.
- Tap: open the parameter editor. See Parameter Definitions.
- Double-tap: bypass or activate the effect.
- The icons above show, from left to right, an effect that is active, bypassed, and muted. When an effect is bypassed, the signal passes through unchanged. When it is muted, the entire path is silent.
- Tap and hold, then drag, to move the effect in the Signal Chain.
- Tap and hold to open a menu:
- Copy / Paste
- Replace effect
- Bypass on/off
- Expression pedal


-
Signal Chain input
- Tap + to select one or more inputs for the Signal Chain.
- Stereo and mono inputs are supported.
- Double-tap to mute the input.
- After you select an input, tap it to edit its parameters. See Input Parameters.
- Tap and hold, then drag, to create a split or a merge.
-
Signal Chain output
- Selecting an output works the same way as selecting an input.

-
Split and Merge
- Split and Merge let you place effects in series or in parallel.
- Tap and hold the Split control, then drag it, to create a parallel path.
- Tap and hold the Merge control, then drag it, to merge this path into another path.
- Tap a Split or Merge point to open its parameters.
- Tap and hold a Split or Merge point, then drag it, to move it.
- Split and Merge work only between two adjacent paths. You cannot route between paths that are not next to each other, such as path 1 and path 3.
-
Empty slot
- Tap an empty area to add an effect.

-
LOOP path
- Tap the input and select LOOP to create a LOOP path. Place your saved Loop Files on this path. While you play, you can layer the playback of several Loop Files. See Looper.
Effects
Browse Effects
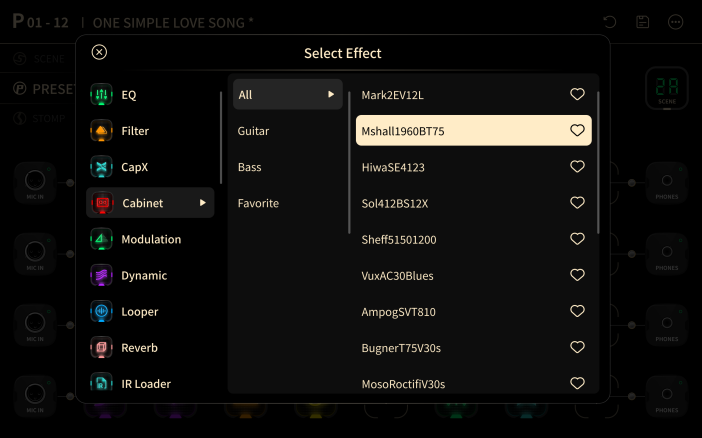
Tap Add Effect to open the effect list. For every built-in model, see the Effects List.
Effect Categories

- Amp
- CapX
- NAM
- NAM Lite
- Cab
- Vocal
- Overdrive
- EQ
- Dynamics
- Modulation
- Reverb
- Pitch
- Filter
- Delay
- Wah
- Volume
- IR Loader
- Loop
- FX Loop
Assign a Footswitch
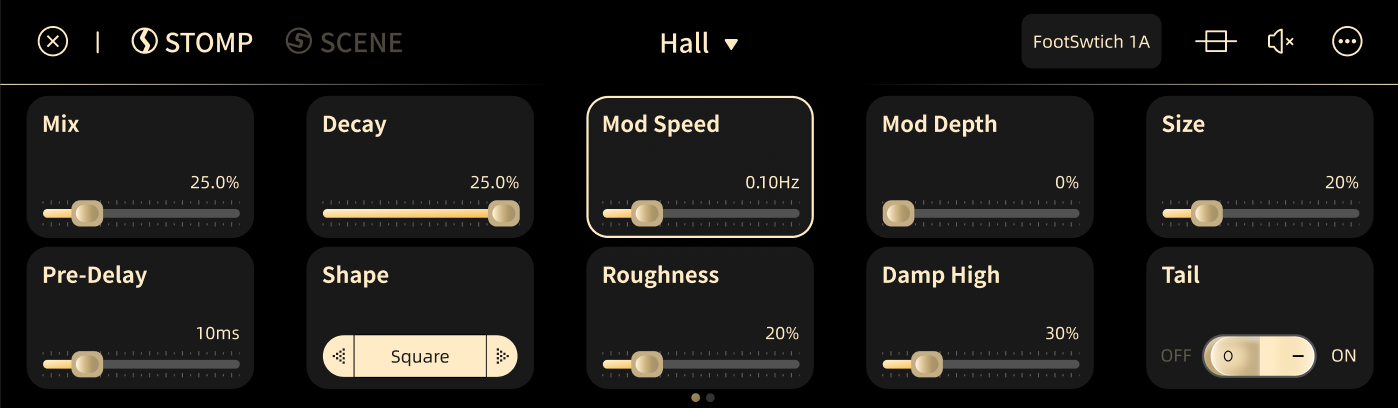
Tap an effect to open its parameters, then use the control in the upper-right corner of the screen to assign a footswitch.
Parameter Definitions
Common parameters
- Gain: sets the amount of gain.
- Drive / Overdrive: sets the amount of overdrive.
- Tone / Treble: controls the high frequencies, from fully open to a deep cut that also reduces some upper mids.
- Volume / Master: sets the overall level of the effect.
- Comp: sets the amount of gain reduction.
- Threshold: sets the level at which the effect starts to act.
- Rate: sets the speed of the effect. Higher settings are faster.
- Depth: sets the intensity of a modulation effect. Higher settings are more pronounced.
- Sync: syncs the effect speed to the current BPM.
- Value: sets the note value when Sync is on. The available range depends on the Tempo and Speed settings.
- Feedback: sets how much of the delayed signal is fed back, and so how many repeats you hear.
- Mix / Blend: sets the balance between the processed signal and the dry signal.
- Decay: sets how long the effect lasts.
- Pre-Delay: sets the time before the effect starts.
- High-Pass / Low-Pass: set the cutoff frequencies of the high-pass and low-pass filters.
- Tail: when on, delay and reverb tails decay naturally after the effect is bypassed.
- Bypass: bypasses the entire effect block.
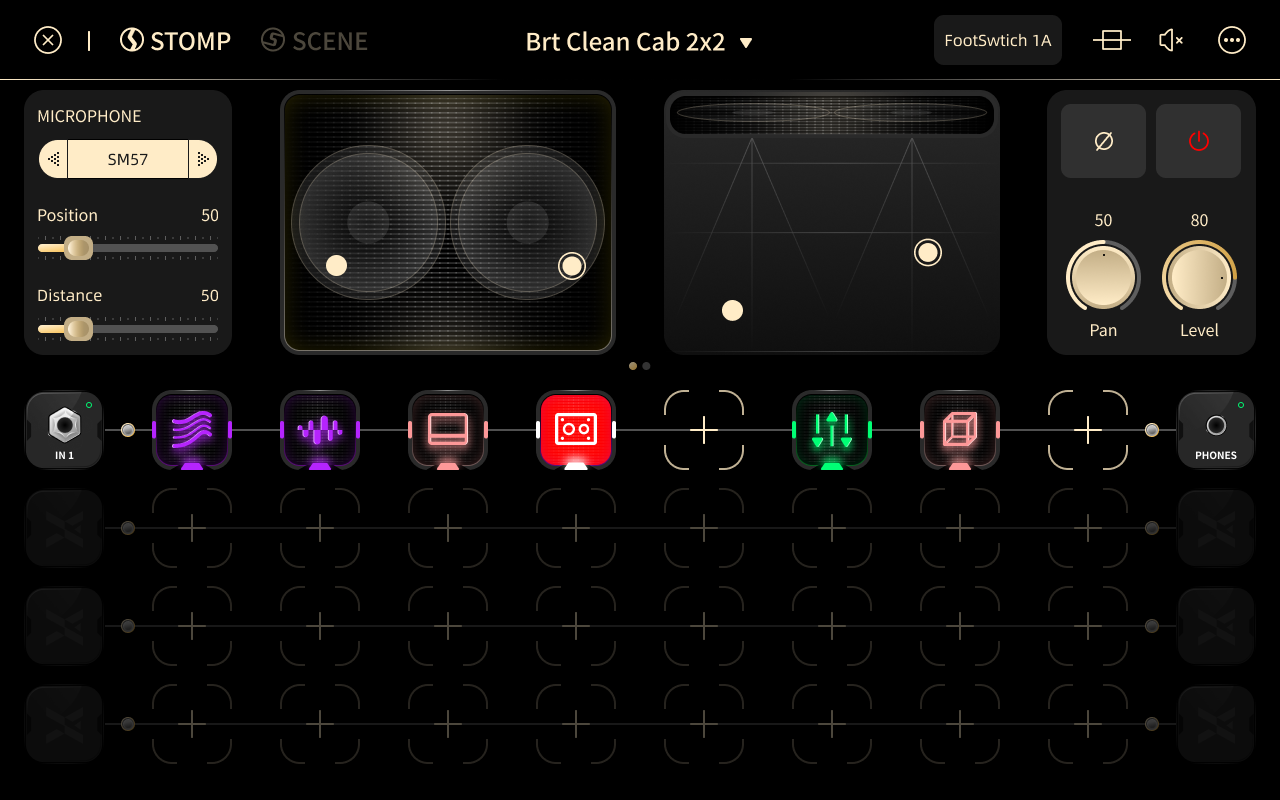
Cabinet Parameters
- Position / Distance: move the virtual microphone relative to the cabinet to change the tone.
- Microphone IR: tap

 to switch between the built-in microphone types, or load a third-party IR file (.wav).
- If you only need one microphone, tap
 to turn the other one off.
- If you hear phase cancellation, tap
 to reverse the polarity.
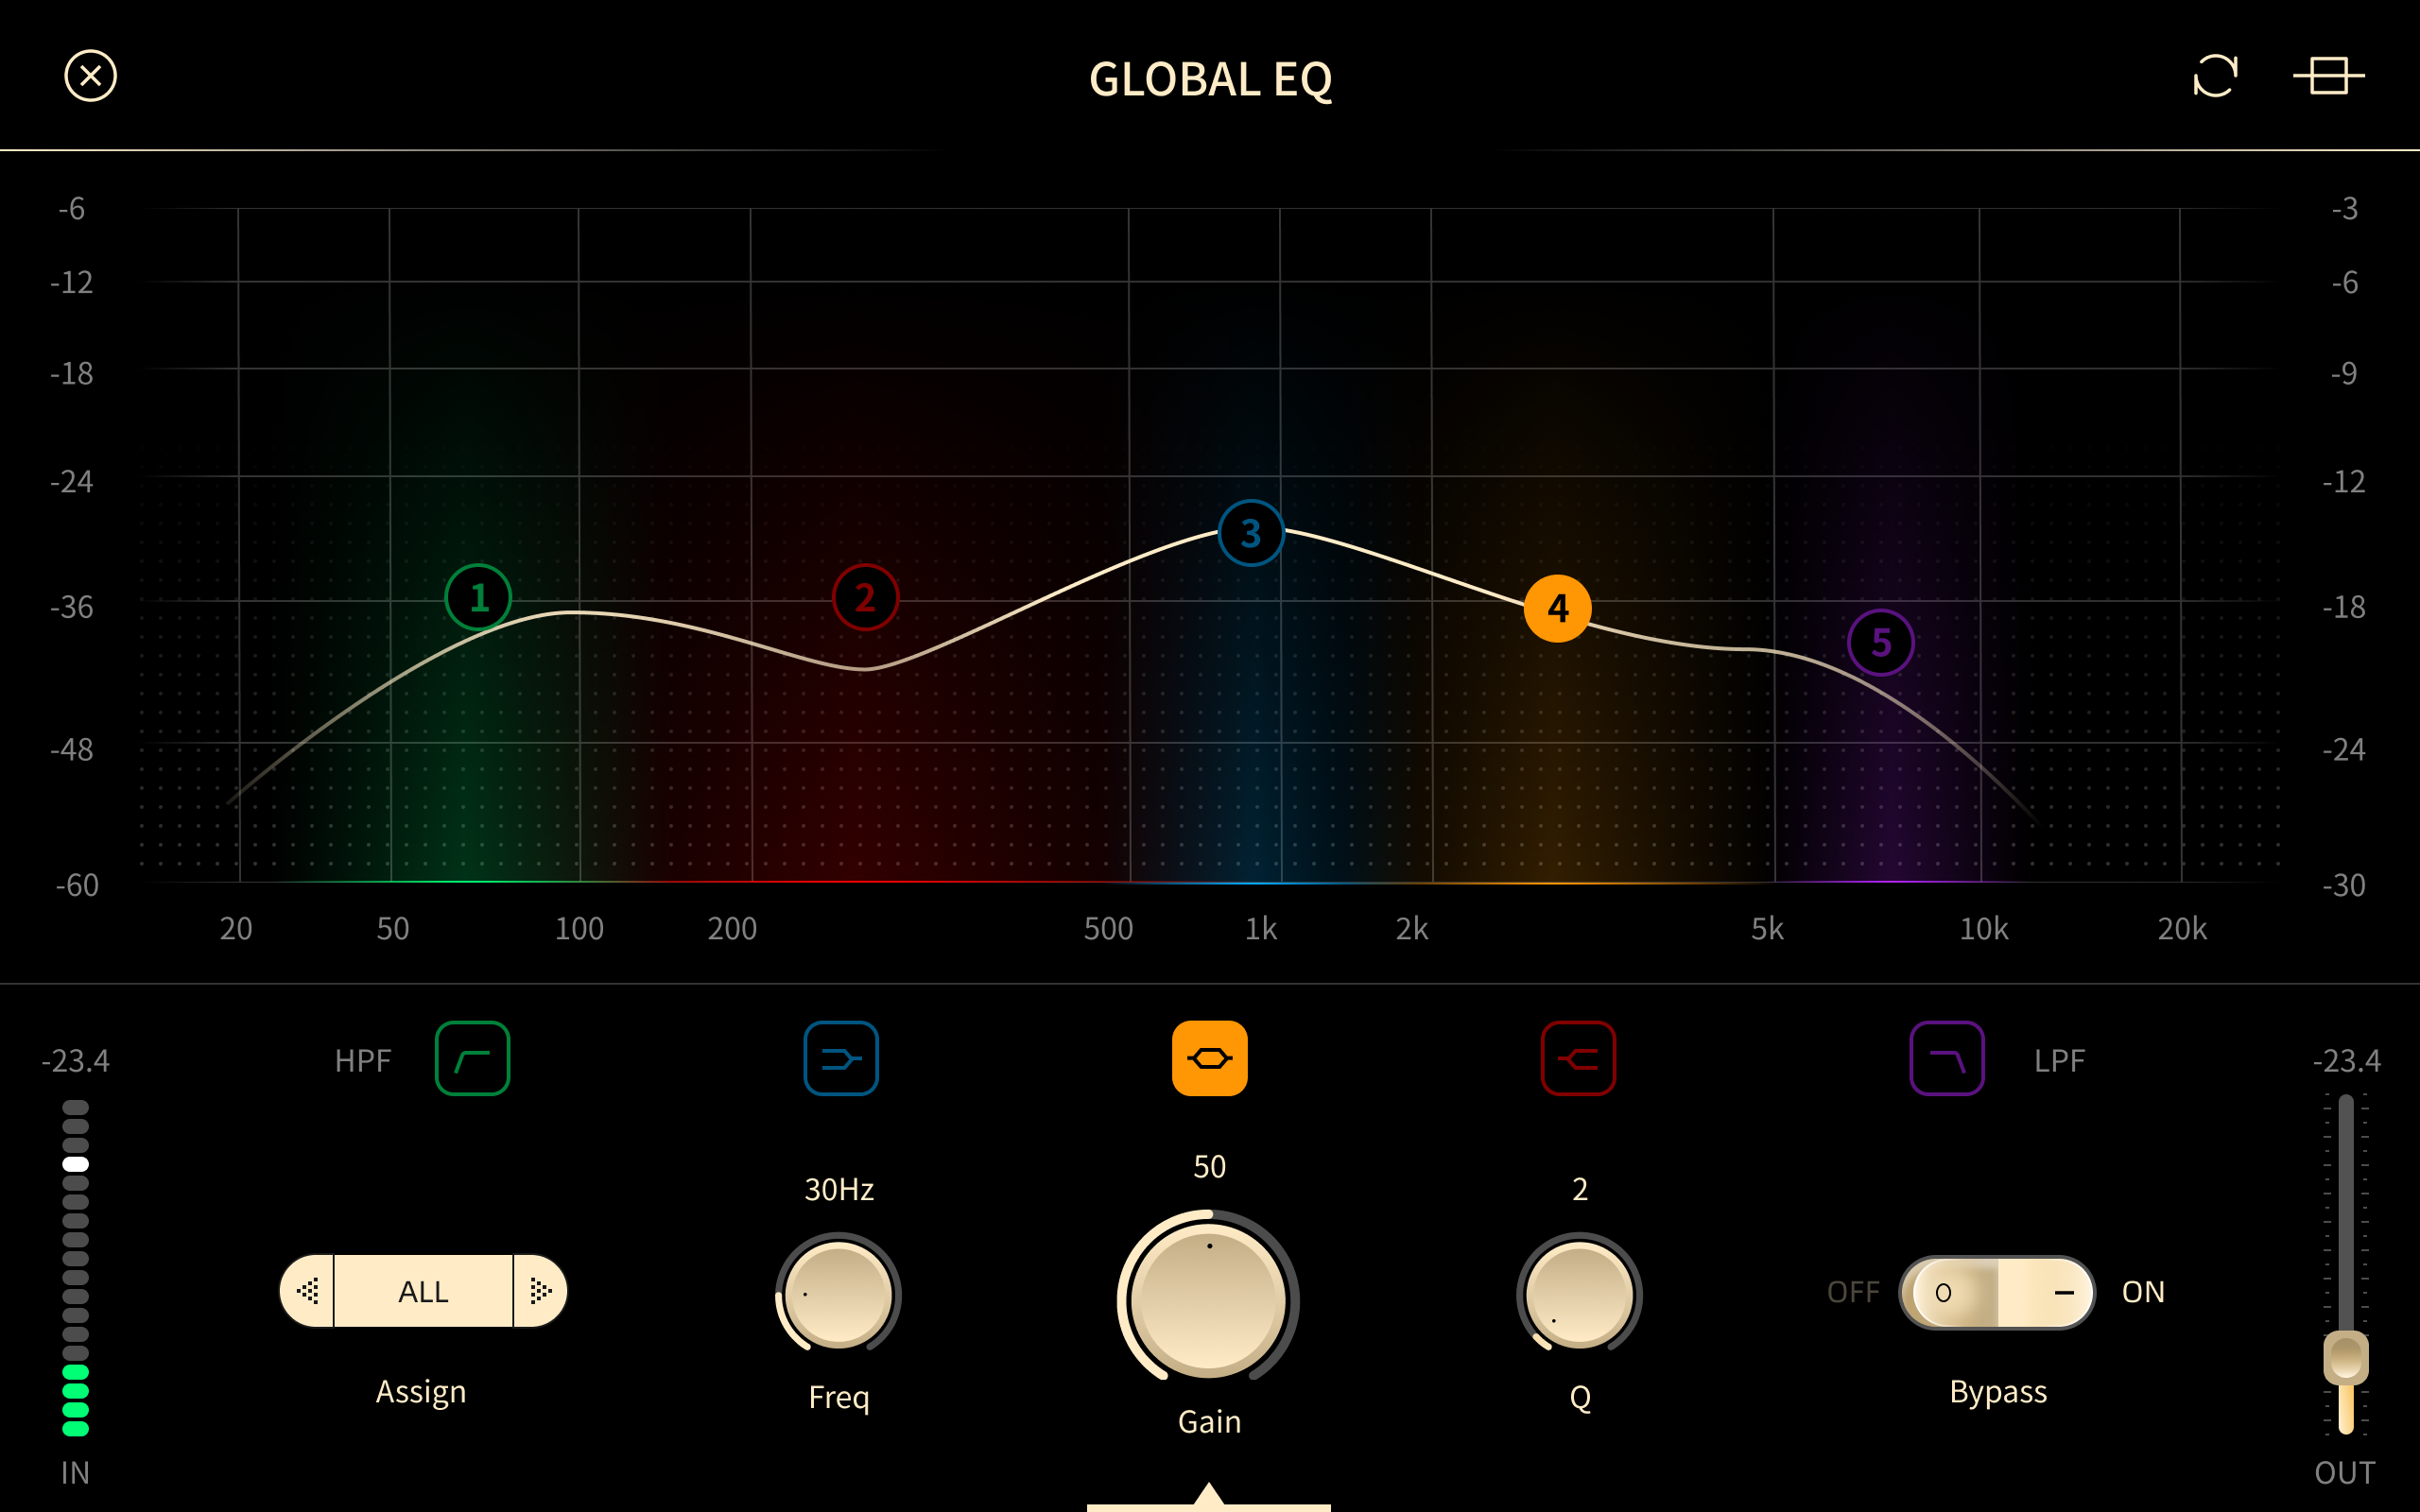
EQ Parameters
- Five-band EQ editor.
- Tap to select bands 1–5.
- Adjust the selected band:
- Assign: selects the output or outputs the EQ is applied to.
- Type:
 Peak: boosts or cuts a band around the node.
 Hi-Pass: removes frequencies below the node.
 Lo-Pass: removes frequencies above the node.
 Hi-Shelf: boosts or cuts all frequencies above the node.
 Lo-Shelf: boosts or cuts all frequencies below the node.
- Gain: the amount of boost or cut for this band.
- Freq: the frequency of the node.
- Q: the width of the band.
- Bypass: bypasses this band.
Signal Chain Input / Output
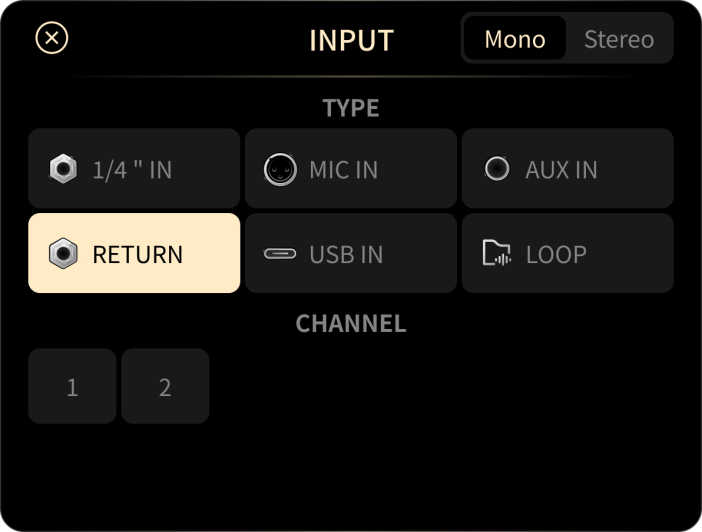
Flexible input and output settings let you run several audio sources at once and connect XR1 to other equipment. Any device that sends or receives audio through one of XR1's jacks or over USB can be part of a Signal Chain.
Select an Input
- Mono: a mono input is routed to the left channel by default.
- Stereo: 1 is the left channel and 2 is the right channel.
Input Parameters
Tap the input to open its parameters. Each Signal Chain input includes a noise gate.
-
Common parameters:
- Gain: sets the input gain.
- Noise Gate: turns the noise gate on or off.
- Attack: sets how quickly the noise gate opens.
- Release: sets how quickly the noise gate closes.
- Threshold: sets the level that opens the noise gate.
-
Special parameters:
- Impedance: sets the input impedance, from 10 kΩ to 10 MΩ (INPUT 1–4 only).
- Position: shows the lowest and highest values of an expression pedal. Move the pedal from heel to toe, then tap Recalibrate if you need to measure again.
Select an Output
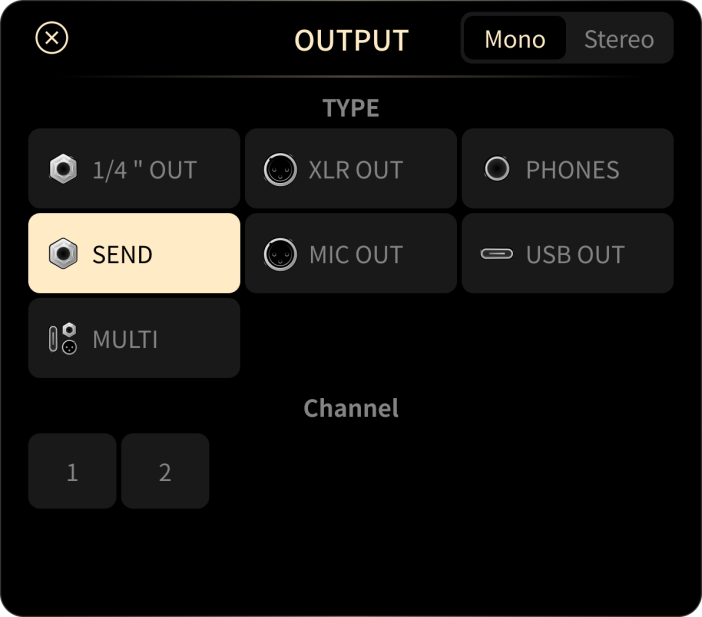
Selecting an output uses the same steps as selecting an input.
Output Parameters
-
Common parameters:
- Volume: sets the output level.
- Pan: sets the left/right balance.
- Mute: mutes this path.
- Solo: outputs only this path and mutes the others.
- Level [dB]: sets the output gain.
- Ground Lift: reduces or removes ground-loop noise.
- Level meter: shows the current output level.
-
Special parameters:
- MIDI THRU: when on, incoming MIDI messages are forwarded to MIDI OUT.
Split and Merge
Basic Operation
- Drag the Split point after the input, or the Merge point before the output, to join this path with an adjacent path.
- Drag a Split or Merge point to move it.
- Split and Merge work between two adjacent paths only.
Merge Parameters
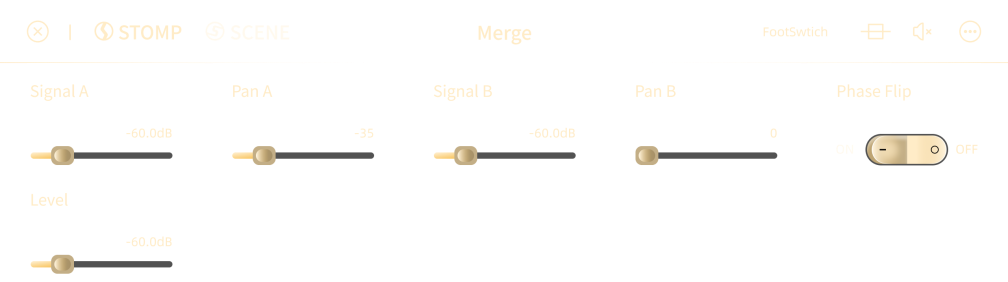
- Signal A: level of path A.
- Pan A: left/right balance of path A.
- Signal B: level of path B.
- Pan B: left/right balance of path B.
- Phase Flip: reverses the polarity of path B.
- Level: output level after the paths are merged.
Split Parameters
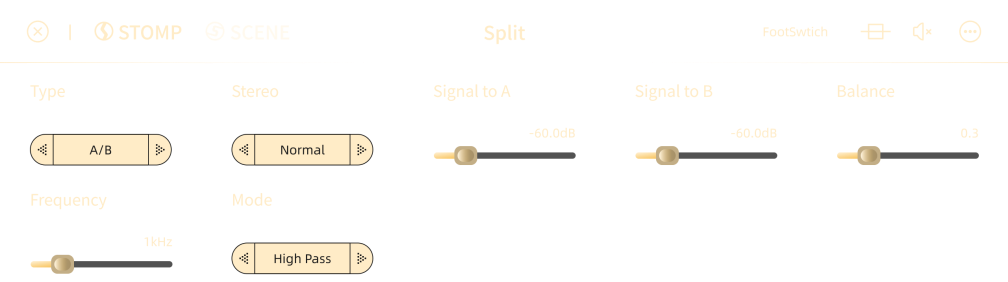
- Type: Balance, A/B, or Crossover.
- Stereo:
- Split: sends the left channel to path A and the right channel to path B.
- Normal: sends both channels to path A and path B.
- Balance (Type: Balance only): sets how much signal goes to path A and how much to path B.
- Signal to A / Signal to B (Type: A/B only): set the level sent to each path separately.
- Frequency (Type: Crossover only): sets the crossover frequency.
- Mode (Type: Crossover only): selects High-Pass or Low-Pass.
Cross-Chain Series
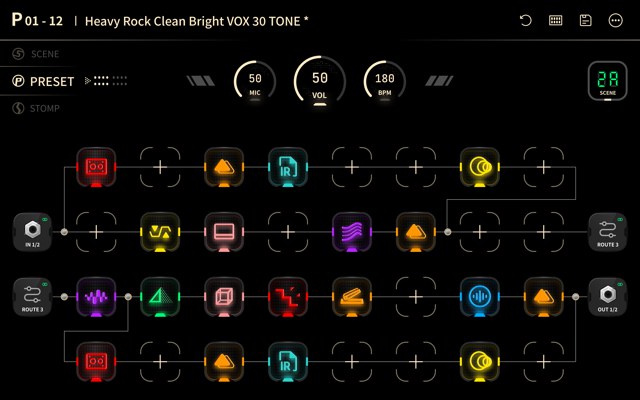
XR1 has four chains. Chains 1 and 2 carry a stereo pair, and chains 3 and 4 are available for extra paths. You can send the output of one chain into another chain, so the chains run one after another.
Routing chains in series is useful in two ways:
- More slots for one path: the second chain continues the same signal path, so one path can hold more effect blocks than a single chain allows. Use this when a detailed tone needs more effects than fit in one row.
- More flexible splits: each chain keeps its own Split and Merge points. You can split a path in one chain, send the two halves through different chains, and merge them again further along the path, which gives more ways to place effects in parallel.
Route a Chain into Another Chain
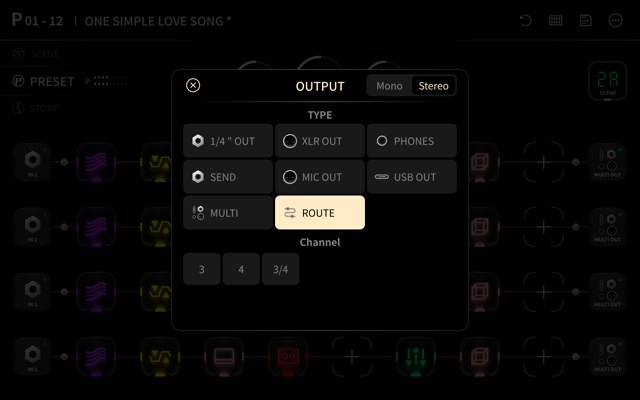
- Tap the output of the chain to open the output dialog.
- Choose ROUTE as the type.
- Choose the channel that receives the signal: 3, 4, or 3/4.
- Tap the check mark in the upper-right corner to confirm.
The receiving chain then shows ROUTE 3, ROUTE 4, or ROUTE 3/4 as its input. That input cannot be changed until you remove the ROUTE output in the sending chain.
Send to Chains 3 and 4
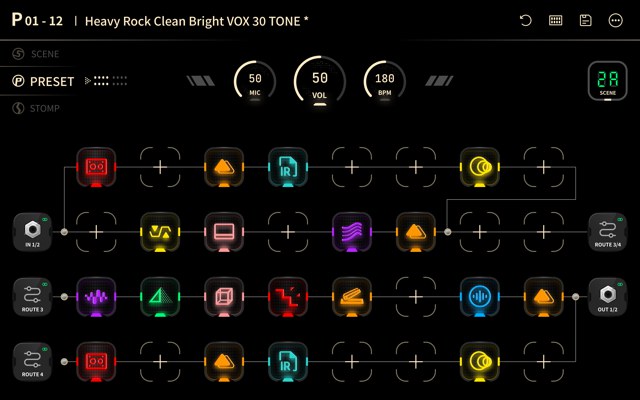
- ROUTE 3: sends the signal of this chain into chain 3.
- ROUTE 4: sends it into chain 4.
- ROUTE 3/4: sends it into both chains at once. Chain 3 receives ROUTE 3, chain 4 receives ROUTE 4, and the output of chain 4 joins the output of chain 3.